You have selected free tutorial of the AutoDesk for the Autodesk Certified User (ACU) Autodesk Maya Certified User Exam
Topics
UI/Scene Management / UI Elements: Menus : Point out common menus like File, Edit, Modify, Create, Display, Window, Assets, Muscle(if it’s loaded) and Help. Talk how everything between File and Muscle or Help (if Muscle is not loaded) changes depending on the different Menu Sets you choose .
AUtodesk help:-
How to get Autodesk Maya 2014 for free! 3 year student license. Fully legal download!
Refer to the following topics for more detailed information on each area.
On first glance, understanding Maya’s interface can seem to be a daunting task

Fortunately, you don’t need to know what all those buttons and icons do right now. One of the best ways to become familiar with the common tools in Maya is to take a look at some of the extensive Help files Maya has available—
specifically, the 1-Minute Startup Movies. Choose Help a 1-Minute Startup Movies, and view the first five movies.
We’ll get into the topics covered by movies 6 and 7 later. Go ahead, watch the movies; I’ll wait. Back already? Great—now you have a little information about some of the common tools, menus, and commands in Maya. Let’s explore them in a bit more detail.
Views
When you start a new Maya scene, the Perspective view opens by default. In 3D, it’s often important to see your scene from more than one view, and it’s easy to do that in Maya. Figure shows the default Maya window.
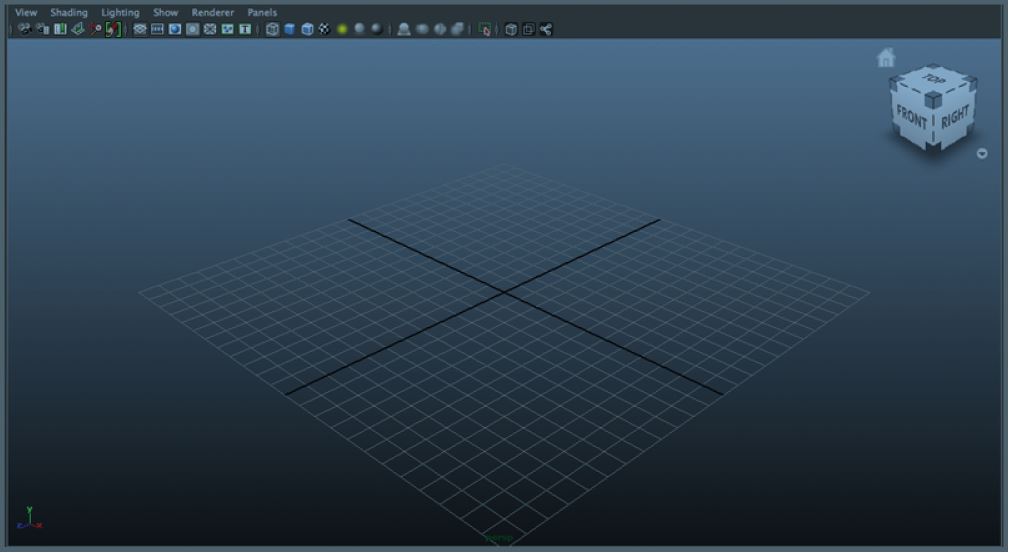
To see multiple views, place your cursor in the Perspective view and tap the spacebar. The single-view window becomes a four-view window with Front, Side, and Top views in addition to the Perspective view you started with. To return to a single view, place your cursor in the view you want to be displayed full-screen and tap the spacebar again. Any of the four views can be displayed full-screen, as well as several other types of views
Time Slider
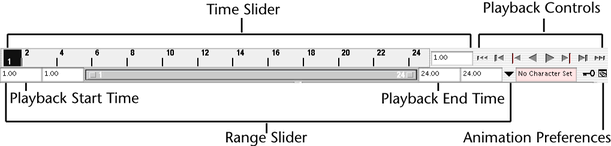
At the bottom of the screen below the view window is the Time Slider, shown in Figure . The Time Slider shows the range of frames that are currently active in the scene, the location of the playback head, and the frames that have keyframes set on them for any selected object. (Keyframes are frames on which you specify actions, such as movement or rotation, for specific objects.
Try moving the playback head around. You can either click a frame to move the playback head to that position, or click and drag the head to move it.
Range Slider
Below the Time Slider is the Range Slider. The Range Slider shows the total number of frames currently in the scene, and the portion of those frames that are currently active. To the left of the Range Slider are two windows containing information about the first frame of the scene and the first frame of the currently active frame range. To the right of the Range Slider are two windows containing information about the last frame of the currently active frame range and the last frame of the scene. Figure shows the Range Slider and the frame windows.
Try changing the length of the active range. One way is to click the square button on the right side of the Range Slider and drag left or right.
Toolbox Window
On the left side of the screen is the Toolbox window, shown in Figure . The Toolbox contains buttons for many of the commonly used tools in Maya, as well as a space that contains the most recently used tool.

Shelves
Above the view window is a nifty little group of icons called a shelf. Maya comes with several default shelves, such as polygonal modeling, animation, and rendering shelves. What’s really handy, though, is that you can create your own custom shelves and populate them with the tools you use most frequently. The default shelves and any custom shelves you create are accessible via the tab on the left side of the shelf or by the tabs that are just above the shelf icons. Figure shows a shelf and the tabs.

Moving Views and Manipulating Objects
Within the Maya 3D space, you can move your position, manipulate an object, or both. The first descriptions in the following list are of the view tools, followed by the tools that enable you to move, rotate, and scale objects: Tumble Tumbling the view enables you to rotate around objects in the scene. The Tumble tool works only in Perspective views. The keyboard combination for tumbling is Option/Alt + left mouse button (LMB).
Zoom
Zooming the view enables you to move closer to or farther away from objects in the scene. The keyboard combination for zooming is Option/Alt + right mouse button (RMB).
- Other Zooming Options
- Maya also has a couple of keyboard commands that zoom in on objects in the scene:
- Press the a key to zoom in to show every visible object in the scene.
- Press the f key to zoom in to show every selected object in the scene. If nothing is selected, the f key behaves like the a key.
The ViewCube
Another way to navigate within a view window is with the ViewCube, shown in Figure You can manipulate the view by clicking and dragging the cube, by clicking a cube face or edge, or by clicking the Home icon above and to the left of the cube, which returns you to the standard view for that window. Try manipulating the view with the ViewCube.
Move Tool
The Move tool can be accessed by clicking its button in the Toolbox (shown in Figure ) or by pressing w on your keyboard. This tool enables you to move an object anywhere in the scene. Clicking and dragging one of the colored handles constrains the motion to that one axis, whereas clicking and dragging the center where the three handles meet allows you to move along more than one axis. Create a polygon sphere by clicking Create a Polygon Primitives a Sphere and then dragging in the view (if a sphere didn’t automatically appear). Select the Move tool, and move your sphere around.

Rotate Tool
The Rotate tool, shown in Figure above, can be selected by clicking its button in the Toolbox window or by pressing e. The red, green, and blue handles surrounding the object constrain the rotation to one axis, and the larger circle outside of them rotates the object parallel to the view plane. Try rotating your sphere around one or more axes. The small circle inside the red, green, and blue circles is used for free rotation on all three axes.
Scale Tool
The Scale tool enables you to change the size of your object. To access the tool, you can click the button, shown in Figure aove, or press r. The object’s handles look similar to the Move handles, but the Scale handles have cubes on their ends. As with the Move tool, dragging a single handle constrains the scaling to that axis, whereas dragging the center where the three handles meet scales on all three axes at the same time. Try scaling your sphere, both on a single axis and as a whole object.
Enlarging or Reducing the Manipulator Handles
Sometimes the manipulator handles for Move, Rotate, and Scale are either too long or too short to work with. Adjusting their length is easy. With one of the tools active, press the Plus key (+) to lengthen (or, in the case of Rotate, enlarge) the handles, or press the Minus key (-) to shorten (or shrink) the handles. Select your sphere, and practice lengthening and shortening the manipulator handles.
Maya Windows and Menus
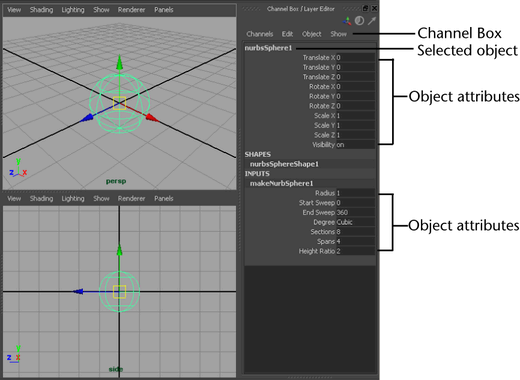
There are several windows and menus in Maya that you’ll use frequently. Some are always available to you, and others are brought up by keyboard commands or mouse clicks: Channel Box/Layer Editor The Channel Box/Layer Editor, which is on the right side of the Maya interface, contains information about the object currently selected, such as its position, scale, and modeling history, or other attributes that have been created. If the Channel Box/Layer Editor isn’t visible, bring it up by clicking its button in the upper-right corner of the Maya interface. Figure below shows the Channel Box/Layer Editor.
Marking Menu
The marking menu, shown in Figure below, allows you to select various attributes of an object, such as edges or faces on a polygon object, or isoparms on a NURBS object. Access the marking menu by right-clicking an object in the scene and continuing to hold the RMB.
Hotbox
The Hotbox is a way to access the menus across the top of the Maya interface without mousing all the way to the top of the window. It contains not only the main menu items but also several other menus that otherwise would be visible only by changing menu sets on the interface. To access the Hotbox, shown in Figure place your cursor in the view window and press and hold the spacebar.

|