|
|
You have selected free tutorial for the Adobe for the Adobe Certified Associate (ACA) course in Adobe Certified Associate in Web Authoring Using Adobe Dreamweaver CS 6/ CC
Topics
Adding Content by Using Dreamweaver / Create, title, name, and save a web page.
Adobe help:- https://helpx.adobe.com/dreamweaver/how-to/first-website-part2.html
A look at the Welcome Screen
A common fi xture in most CS6 applications is the Welcome Screen, which is a launching pad for new and recent documents. In Dreamweaver, the Welcome Screen appears when the application launches or when no documents are open. From the Welcome Screen, you can create new pages, create a new site, open a recent document, or use one of Dreamweaver’s many starter pages or layouts.
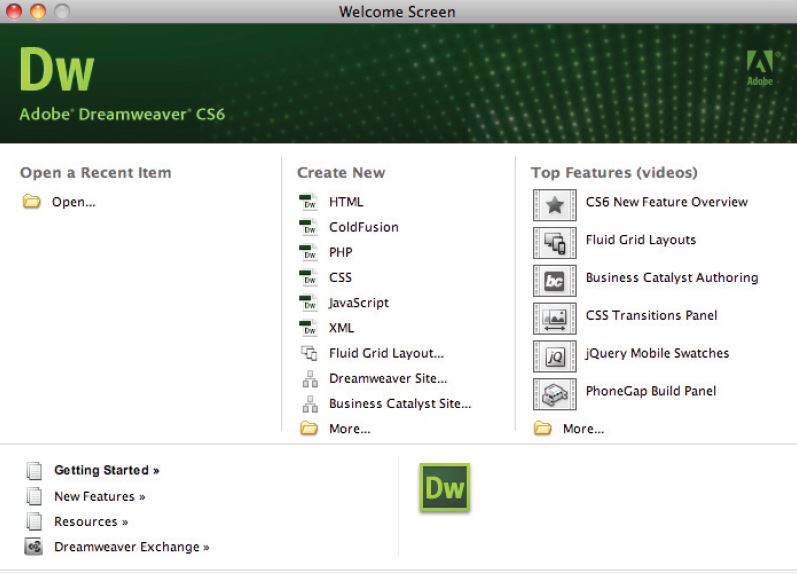
Here’s what you’ll fi nd on the Welcome Screen:
- Open a Recent Item: A list of the last few documents you worked on appears in the far left column, or you can browse to open a diff erent fi le using the Open button at the bottom.
- Create New: In addition to HTML pages, you can choose from a variety of new document formats, such as CSS, JavaScript, and XML. Dreamweaver is not just a web page-building tool, but also a superior text editor, making it ideal for creating many non- HTML fi les. You can also defi ne a new Dreamweaver site using the link at the bottom, or choose the More folder for even more new fi le options.
Creating new documents
Dreamweaver creates text fi les most commonly in the form of HTML fi les (or web pages). It can also create fi les in a variety of text-based languages, including CSS, XML, JavaScript, and even Flash ActionScript. You can create blank fi les that you build from the ground up, or you can get started with a variety of layout templates and themes. You can create new documents from the File menu or from the Welcome Screen. Here, you’ll create a new page using the File menu.
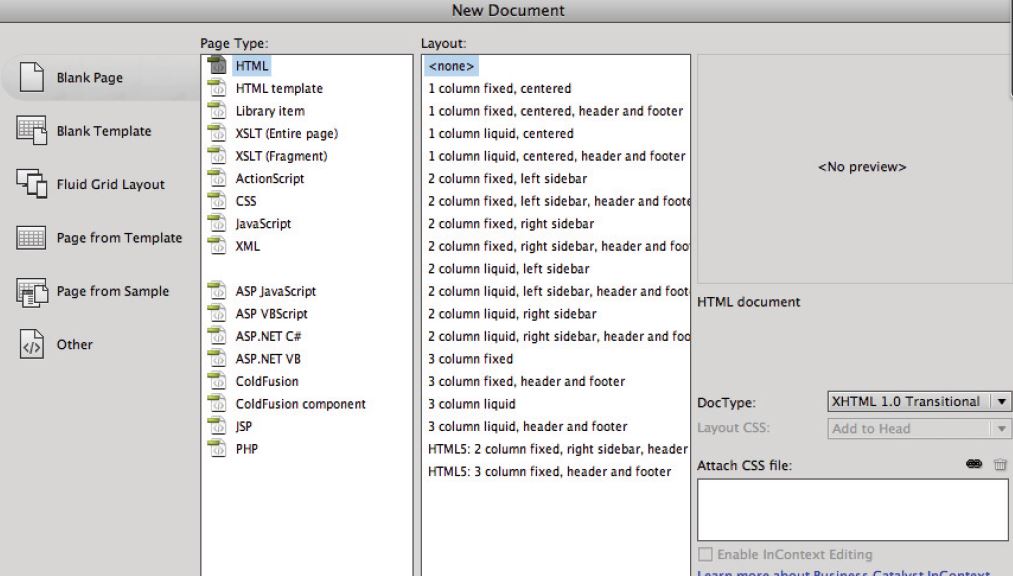
- To create a new document, choose File > New. The New Document dialog box appears.
- Select Blank Page and under the Page Type column, choose HTML. Under Layout, choose
to start a new blank document. Leave the DocType drop-down menu at its default. Press Create.
- Choose File > Save or File > Save As to start the process of saving your document.
- When prompted, choose a location for your fi le and assign it a name. Note that you must save HTML fi les with an .html extension, or they will not be interpreted properly in a browser. This rule applies for fi les of any type (such as .xml, .css, and .cfm).
Creating a new site
In Dreamweaver, the term site refers to the local and remote storage locations where the fi les that make up a website are stored. A site can also include a testing server location for processing dynamic pages. To take full advantage of Dreamweaver’s features, you should always start by creating a site. In Dreamweaver CS6, there is a new category called a Business Catalyst Site. Business Catalyst is a service that Adobe provides (for a fee) that allows you to connect your website with analytic software and other features. However, we do not cover setup of Business Catalyst sites .
The easiest way to create a standard new site in Dreamweaver is to use the Site Setup dialog box. One way to access this dialog box is by choosing Site > New Site from the menu bar.
you begin by using the Site Setup dialog box to accomplish the following tasks:
- Define the site
- Name the site
- Define the local root folder
- Set up a remote folder
- Explore advanced settings
- Save the site
By default, the Site Setup dialog box opens with the Site Settings available. The options available here will help guide you through the essentials of defi ning your site. The Servers, Version Control, and Advanced Settings options allow you to set up local, remote, and testing servers directly.
- Launch Dreamweaver CS6, if it is not already open, then choose Site > New Site. First, you have to name the site. In the Site Name text fi eld, type Your_File_Name. Next, you need to set up a local root folder, which is where Dreamweaver stores the fi les with which you’re currently working. The Local Site Folder fi eld allows you to enter information regarding where you’ll be working with your fi les during development.

- Click on the Folder icon ( ) to the right of the Local Site Folder text field to navigate to any pre-existing files. If you did not click on this folder and clicked Save, Dreamweaver would simply create a new folder on your system where you could begin to create new pages in your site. In this case, you will be pointing to a preexisting folder that already has files within it. It is important to distinguish between adding a new site (which is what you are doing now) and creating a new site from scratch. In both cases, the important part is that Dreamweaver knows where this folder is on your system. This folder is known as the root folder and will always contain the content that will eventually be your website.
- Navigate to your desktop and locate the NEW folder
- Select the NEW folder. On the Windows platform, click Open to open this folder, then press Select (Windows). On the Mac OS platform, press Choose to choose this as your local root folder. The field now shows the path to your newly defined local root folder.. At this point, you have done the minimum amount of steps required to begin working on a site, however you will take a look now at some of the optional features within the Site Setup process.
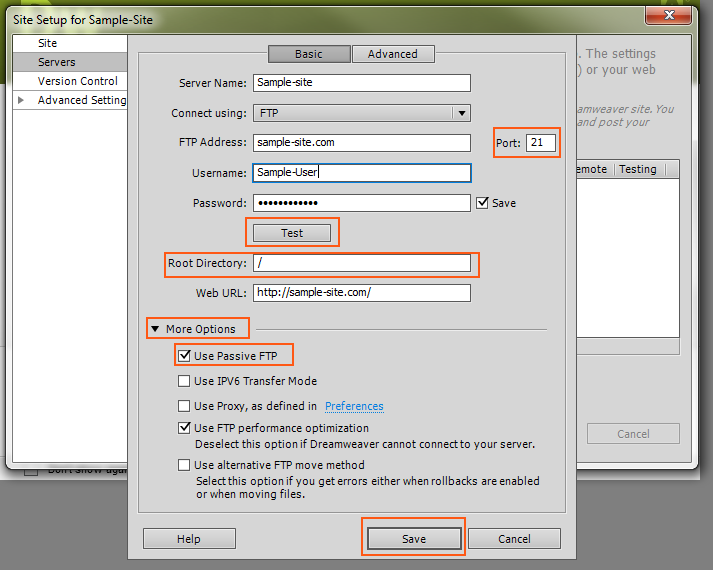
- Click on the Servers tab. This section allows you to defi ne the remote server where your website will end up being hosted. Take a moment to read the heading in the dialog box. Note that it says you do not need to fi ll in this information to begin creating a website. It is only necessary if you are connecting to the Web. You are not connecting to the Web in this lesson, but you should take a look at the screen anyway to understand the information needed.
- Click on the + button and the Basic site settings window appears. Here there are fi elds for Server Name, Connect Using, FTP Address, Username and Password, along with other options. These settings allow you to choose both a destination and a method (FTP being the most common) for Dreamweaver to use to transfer files. As noted earlier, this is an optional step, and you do not have to defi ne your remote folder at this stage. Dreamweaver allows you to defi ne your remote folder at a later time, such as when you’re ready to upload.
- Click on the Advanced tab. Click on the Server Model menu in the Testing Server section. Here there are choices for diff erent scripting languages such as PHP and ASP pages. If you are an advanced user, this is where you would set up the connections to your testing server. Again, you won’t be making any changes here, so press Cancel.
- Click on the Version Control option on the left to access Subversion settings. Subversion, a VCS (or version control system), keeps track of changes made to fi les, enabling users to track changes and return to previous versions of any fi le. For this exercise, make sure the Access pull-down in this window is set to None, as you won’t be using Subversion. You’ve now completed the site setup process, using basic settings. Don’t close the Site Setup dialog box yet, though, as you’ll now explore the options found under the Advanced Settings option.
-

Advanced site-creation options
Chances are if you are new to Dreamweaver or web design you won’t need these advanced settings. If you are in this category, press Save and skip to the Adding Pages section. Other users may be curious what these settings are and should proceed.
- Click on the arrow next to Advanced Settings in the Site Setup dialog box.
- From the categories listed below Advanced Settings, choose Local Info.
The information you set in the Local Info window identifi es your Default Images folder, what your links are relative to, and a web URL to be used if you don’t have a remote server defi ned. One of the more important Local Info settings, though, is casesensitive link checking. The case-sensitive link checking feature ensures that your links will work on a Unix server, where links are case-sensitive. If you’re using a Windows or Mac OS server, this doesn’t matter as much, but it is a good idea to follow the strict naming and linking conventions of a Unix system in case you ever move your site to a different server.
|
Your Salary Above $ 66000... Click ...
Ohh! You want More.... be game developer of your choice $ 102000 ....
|