|
|
You have selected free tutorial of the Microsoft Corporation for the Microsoft Office Specialist (MOS) :
77-418: Word 2013 Core Topics : Apply references :
Create captions •Inserting endnotes, managing footnote locations, configuring endnote formats, modifying footnote numbering, inserting citation placeholders, inserting citations, inserting bibliography, changing citation styles
Microsoft Help:-
When using Microsoft Word, authors manage bibliographic data and document references in reports and research papers consistent with standard document styles.Microsoft Word newer versions , the process of managing document sources and citations and the bibliography within a document is now semi-automatic process. Word not only has the ability to manage citation and bibliographies, it only takes a click of the mouse to switch between different documentation styles.
Word provides features for creating bibliographic sources, inserting citations, adding footnotes and endnotes, and generating either a bibliography or Works Cited page and updating the bibliography listing at the end of the document. This tutorial will address each of these elements.
How to Use the Microsoft Citations & Bibliography Tool:-
- create a source: All citations in a formal document refer back to sources. When documenting references within a document, the first step is to add each source into the source database. You have the option of adding sources to your paper any time. You can add sources before entering the document "body" text, during the writing process, or after all "body" text has been entered. It is possible, and may be convenient to add new sources as citations are added to quoted sections of the document. Citations and bibliographic sources can be added in any order and whenever it is convenient. For this section of the tutorial, we will first add a source, and then add the respective citation to the section of quoted text.
- Add a source to the database: With the document open in Word, click the References tab. Then, in the Citations & Bibliography group, click the Manage Sources button, which will display the Source Manager dialog box.
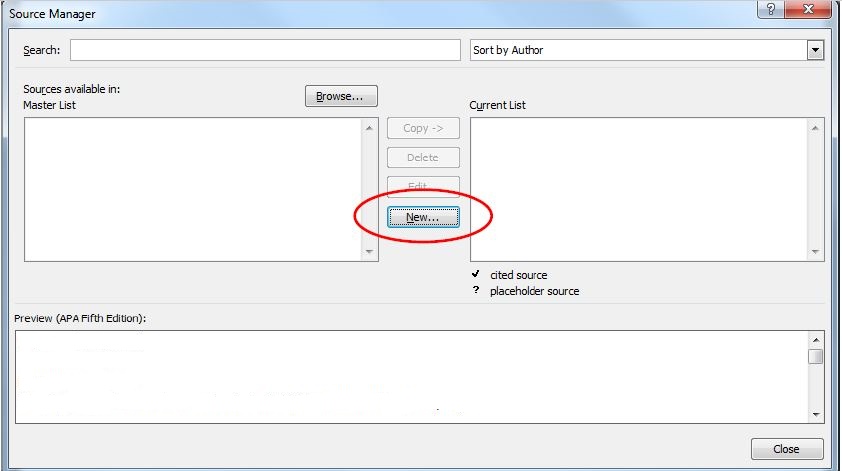 Click the New… button to add a new source, which will then display the Create Source dialog box. In the Create Source dialog box, in the Type of Source dropdown, select "Book".
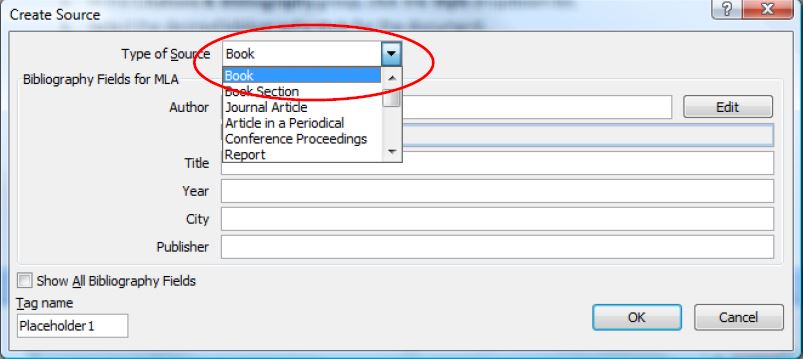 Now, add the book information. If desired, the ISBN field can be shown by adding a check to the Show All Bibliography Fields checkbox. When the information has been correctly entered, click the OK button.
 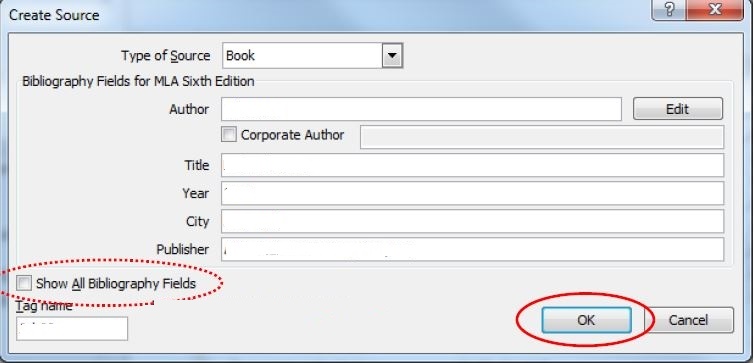 Each source entered in this manner will be saved into both the "Master List" bibliographical database and the "Current List" bibliographical database. The "Master List" database is stored locally on the computer on which the document is being edited. Working at different workstations will distribute the "Master List" database across several computers, which is undesirable. Thankfully however, the "Current List" database, which contains all of the sources added for the current document, follows the document and is available whenever/where ever the document is being edited. Continue to add sources whenever additional sources are identified. New sources can be added at any time while the document is being edited.
- Inserting an inline citation: A citation is an in-text parenthetical reference. Based on the document style, the citation may include the author’s name, the year, the source’s title, and the page(s) on which the quotation appears in the source document… or a combination of these elements. Inserting a citation is a two step process – adding the source to the database and then inserting the citation into the document. If the source has already been created and added to the "Current" database, then all that is needed is inserting the citation and linking it to the correct source.Place the insertion point at the exact location where the citation should be located, according to the applicable style requirements. For this example, place the insertion point at end of the first paragraph, immediately before the period. The placement of the insertion point determines exactly where the citation will be placed. Before adding the citation, make sure the insertion
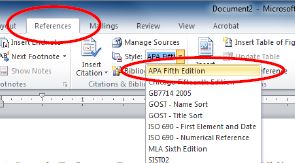
point is placed EXACTLY where the citation is required to be placed.On the References tab, and then in the Citations & Bibliography group, make sure that the style is set to "APA".Again on the References tab, and then in the Citations & Bibliography group, click the Insert Citation button. (bottom arrow in the next screen capture)Notice that all of the sources entered so far are listed on the dropdown from the Insert Citation button; in this case only one source has been entered into the database. On this dropdown, click the appropriate source. Notice that the inline parenthetical citation has been added. Notice that the citation was added at the location of the insertion point.
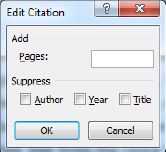
- Editing the Citation – Adding the page number to the citation: Click on the inline citation. You will see that the citation is actually a Word-generated (controlled) field. A Citation field "box" appears around the citation, and at the right-hand edge of the Citation field "box" is a dropdown button. Click that dropdown button to display the Edit citation short-cut menu,
- Click the Edit Citation menu item to display the Edit Citation dialog box.
- In this Edit Citation dialog box, the specific page number of the quote can be entered, and the year deleted. In addition as you can also see that the Author, Year, and Title can be suppressed (hidden) or displayed in any combination. Add checks to the checkboxes to control which information is displayed in the citation. Click the OK button when ready to update the citation.
- Citation completed
- How to edit a source Editing that is already in the source management database is very easy. Open the source management database. On the References tab, in the Citations & Bibliography group, click on the Manage Sources button to open the Source Manager dialog box.
|
Your Salary Above $ 66000... Click ...
Ohh! You want More.... be game developer of your choice $ 102000 ....
|